[Unity] VR Keyboard | Unity Tutorial for Oculus Quest(VR 키보드 만들기)
by Sugar0810준비물 세팅
아래의 패키지를 프로젝트에 임포트

레이어 지정
아래 사진처럼 네 개의 레이어 지정
Tags and Layers
- Hands
- Interactive
- Typing Hands
- Keyboard

Physics

키보드 제작
오브젝트 추가
- 빈 오브젝트(Keyboard)
- 3D Cube(Board) 생성 후 포지션 (1, 0.05, 0.4) 지정, Gray 머티리얼 적용

- 빈 오브젝트(Buttons)
- 빈 오브젝트(Normal)
- 빈 오브젝트(Numbers)
- 프리팹(Square Button) ---> 포지션 y 0.03 / 언팩하기 / 이름 변경(KeyboardButton)
- 빈 오브젝트(Numbers)
- 빈 오브젝트(Normal)
- 빈 오브젝트(Typing Area)


KeyboardButton 자식으로 Text 생성

캔버스와 텍스트 인스펙터 변경


캔버스를 Press 하위로 이동

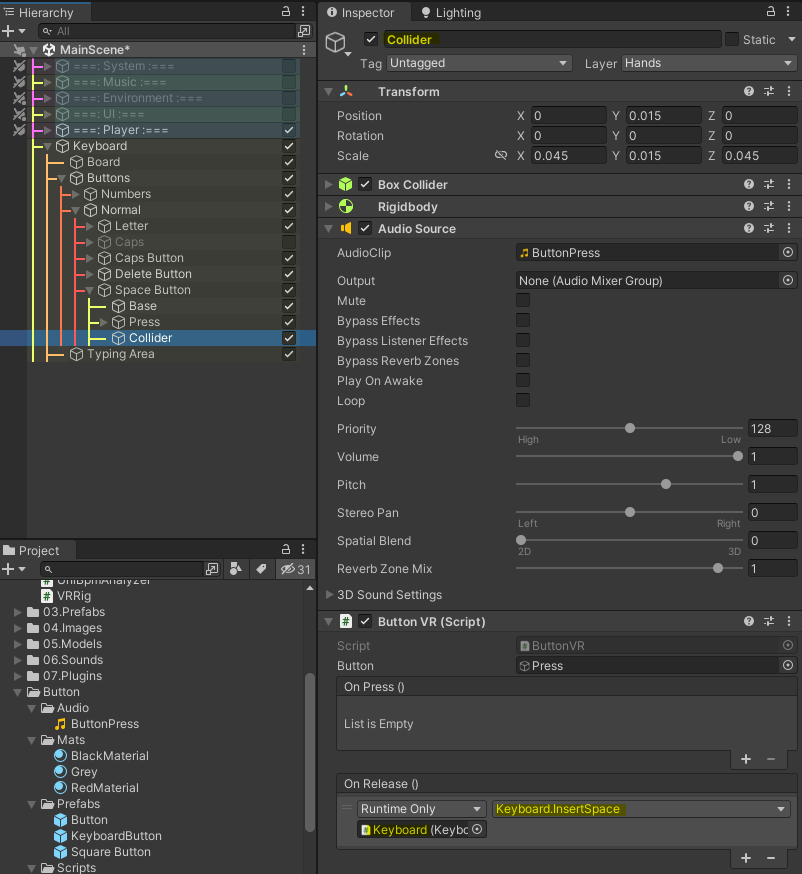
Collider 오브젝트 컴포넌트에 기존 On Release() 이벤트 삭제

- Keyboard.cs ---> Keyboard 오브젝트에 지정
using UnityEngine;
using TMPro;

public class Keyboard : MonoBehaviour
{
    public TMP_InputField inputField;
    public GameObject normalButtons;
    public GameObject capsButtons;

    bool caps;

    private void Start()
    {
        caps = false;
    }

    public void InsertChar(string c)
    {
        inputField.text += c;
    }

    public void DeleteChar()
    {
        if (inputField.text.Length > 0)
        {
            inputField.text = inputField.text.Substring(0, inputField.text.Length - 1);
        }
    }

    public void InsertSpace()
    {
        inputField.text += " ";
    }

    public void CapsPressed()
    {
        if (!caps)
        {
            normalButtons.SetActive(false);
            capsButtons.SetActive(true);
            caps = true;
        }
        else
        {
            normalButtons.SetActive(true);
            capsButtons.SetActive(false);
            caps = false;
        }
    }
}- KeyboardButton.cs ---> KeyboardButton 오브젝트에 지정
using TMPro;
using UnityEngine;

public class KeyboardButton : MonoBehaviour
{
    Keyboard Keyboard;
    TextMeshProUGUI buttonText;

    private void Start()
    {
        Keyboard = GetComponentInParent<Keyboard>();
        buttonText = GetComponentInChildren<TextMeshProUGUI>();
        if (buttonText.text.Length == 1)
        {
            NameToButtonText();
            GetComponentInChildren<ButtonVR>().onRelease.AddListener(delegate { Keyboard.InsertChar(buttonText.text); });
        }
    }

    public void NameToButtonText()
    {
        buttonText.text = gameObject.name;
    }
}- TypingArea.cs ---> Typing Area 오브젝트에 지정
using UnityEngine;

public class TypingArea : MonoBehaviour
{
    public GameObject leftHand;
    public GameObject RightHand;
    public GameObject LeftTypingHand;
    public GameObject RightTypingHand;

    private void OnTriggerEnter(Collider c)
    {
        GameObject hand = c.gameObject;
        if (hand == null)
            return;
        if (hand == leftHand)
            LeftTypingHand.SetActive(true);
        else if (hand == RightHand)
            RightTypingHand.SetActive(true);
    }

    private void OnTriggerExit(Collider c)
    {
        GameObject hand = c.gameObject;
        if (hand == null)
            return;
        if (hand == leftHand)
            LeftTypingHand.SetActive(false);
        else if (hand == RightHand)
            RightTypingHand.SetActive(false);
    }
}
KeyboardButton 오브젝트 프리팹화

숫자 자판 만들기
아래의 1번 포지션부터 x -0.06씩 10번까지 생성

문자 자판 만들기
Numbers 오브젝트를 복사한 Letter 오브젝트 생성 후 빈 오브젝트(Row 1) 만들어서 버튼들을 하위로 넣는다.

y -0.6씩 더해서 각각 이름을 변경한다.

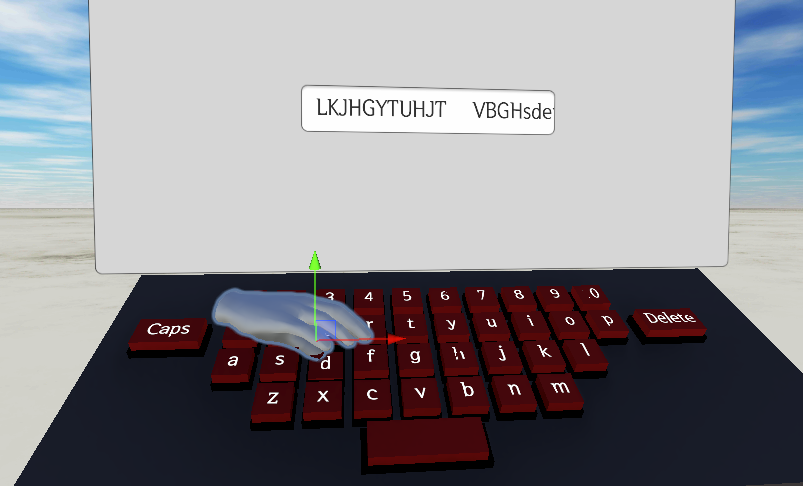
실행 화면

normal 하위에 있던 numbers를 빼준다.

대/소문자 변환 자판 만들기
normal을 복사하고 복사한 오브젝트의 이름은 'Cpas'로 변경한다.
이후 네임도 대문자로 변경 ---> 실행해본다.

캡스락 변경 버튼을 만든다.
프로젝트 뷰로 빼 두었던 'KeyboardButton' 프리팹을 normal 하위에 불러오고 언팩한다.
이름은 'Caps Button'으로 변경 후 포지션(-0.4, 0.03, 0.04) / 스케일 (2, 1, 1)로 변경한다.
텍스트도 길어지므로 텍스트 스케일만 (0.5, 1, 1)로 변경해준다.

그리고 하위 collider의 On Release() 이벤트에 KeyboardCapsPressed()를 매핑한다.

Delete 자판 만들기
대/소문자 변환 자판을 복사한다. 포지션은 (0.34, 0.03, 0.04) / 콜라이더에 Keyboard.DeleteChar()를 맵핑한다.


Space 자판 만들기
Delete 변환 자판을 복사한다. 포지션은 (-0.06, 0.03, -0.14) / 콜라이더에 Keyboard.InsertSpace()를 맵핑한다.

지금까지의 최종 오브젝트의 모습과 Keyboard 매핑이다.

타이핑 필드 만들기
- Typing Area
- 3D Cube(Typing Collider)의 스케일은 Board의 스케일을 복사해서 붙여 넣어 준다.

Typing Collider의 컴포넌트 중 메쉬 필터와 렌더러를 삭제하고 박스 콜라이더 사이즈가 5를 초과하지 않을 범위로 늘려준다. 그리고 isTrigger를 체크해준다.(사진에는 언체크 되어있음)

이후 부모부터 키보드 레이어로 설정, 타이핑 에어리어 레이어는 인터렉티브로 설정


모니터 만들기
인풋필드가 중요하므로 UI 캔버스 / 이미지/ 인풋필드를 배치한 뒤 키보드의 스크립트에 매핑한다.

매핑
동영상에선 OVR SDK를 이용하지만 나는 XRI 기반 프로젝트를 제작하고 있으므로 이제부턴 다른 방법으로 진행한다.
먼저 핸드 콘트롤러 부모에게 Hands 레이어를 지정한다.

이후 빈 오브젝트를 핸드 콘트롤러 자식으로 만들고 콜라이더 지점을 만든 뒤 타이핑 핸드 레이어를 지정한다. 마지막으로 비활성화해준다.
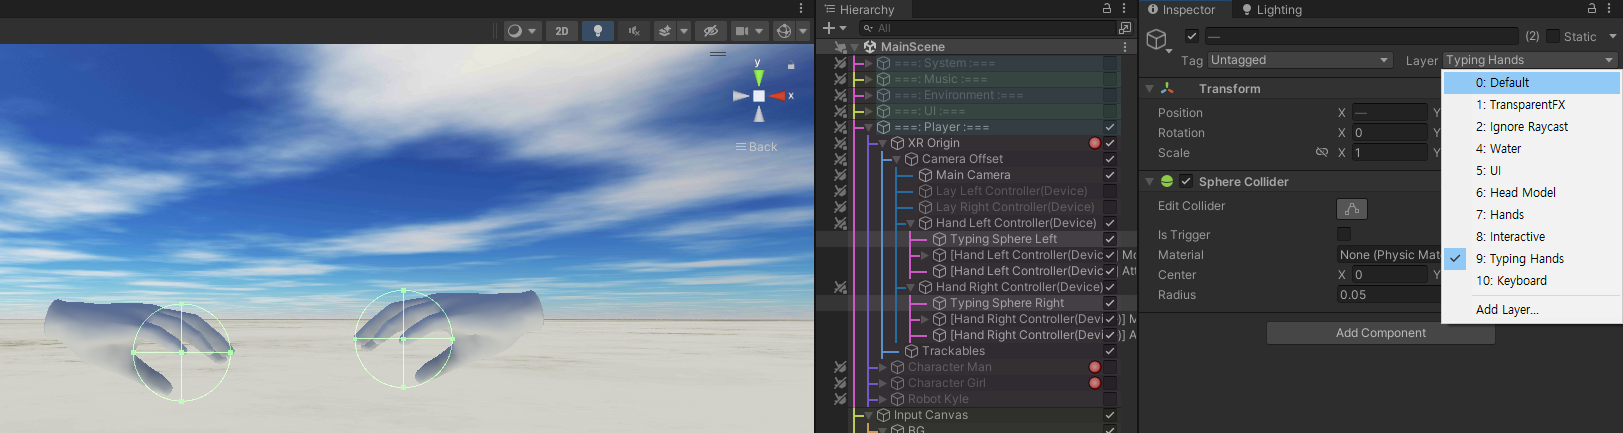
이후 매핑

나머지 설정
- Caps 오브젝트는 비활성화 해준다.
- Typing Area에 Rigidbody를 넣어주고 중력 언체크, 키네마틱 체크한다.
- 키보드 버튼 프리팹 내부에서 콜라이더를 그림과 같이 변경해준다.

결과
참고 사이트
'⚙️ Programming > C# & Unity' 카테고리의 다른 글
| [Unity] Event 2 - Action (0) | 2023.08.14 |
|---|---|
| [Unity] Unity Event 1 - Button Onclick Listener Scripting + Lambda(유니티 이벤트 1 - 버튼 스크립트로 매핑하기 (온클릭 리스너) + 람다식) (0) | 2023.07.26 |
| [Unity XR] Android Build Optimization Setting(유니티 XR 안드로이드 최적화) (0) | 2023.07.26 |
| [Unity] OnEnable() 활용 점수 시스템 구현 (0) | 2023.07.25 |
| [Unity] Sync Objects With Music(오디오 클립으로부터 BPM 추출하기) (0) | 2023.07.25 |
블로그의 정보
Sugar
Sugar0810